

Important: Do NOT Sign This Form Before Your Appointment
Form DS-4080 is one of the most important documents in the renunciation process. This is the actual Oath of Renunciation, where you formally renounce your U.S. citizenship.
Do not sign this form before your appointment.
The oath must be signed in person, in front of a U.S. consular officer, during your renunciation appointment. The officer will witness your signature and administer the oath.
If you’re still preparing for your embassy visit, read our guide on how to prepare for your renunciation appointment to understand what documents to bring, what to expect during the interview, and the steps involved in obtaining your Certificate of Loss of Nationality (CLN).
What Is Form DS-4080?
DS-4080 is the formal oath used when renouncing U.S. citizenship under Section 349(a)(5) of the Immigration and Nationality Act.
By signing this document, you are stating that:
- You understand what you are doing
- You are acting voluntarily
- Nobody is forcing you to renounce
- You intend to give up your U.S. citizenship
The Department of State will use this document when deciding whether to issue your Certificate of Loss of Nationality (CLN).
Form DS-4080 is just one part of the overall renunciation process. If you’re still researching the requirements, costs, tax implications, and timeline, see our complete guide to renouncing U.S. citizenship.
How to Complete Each Section
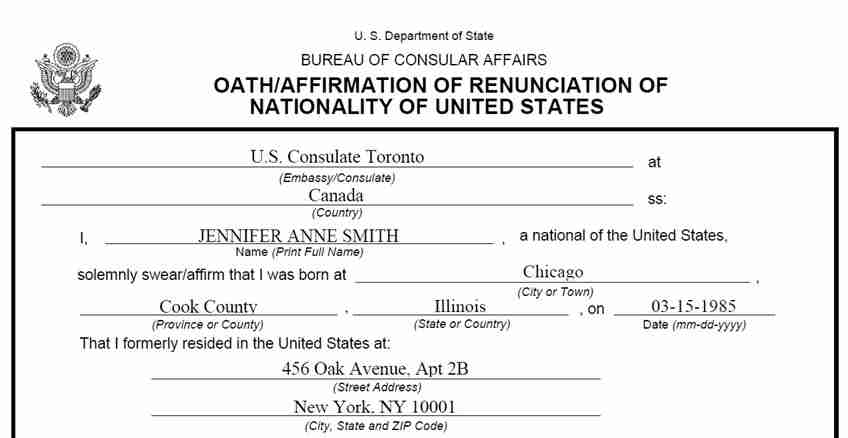
Embassy/Consulate (top of form, next to ‘at’)
Write the full official name of the U.S. embassy or consulate where your appointment is taking place. The consular officer will usually fill this in, but know what it should say.
Example: U.S. Embassy Sofia
Country (second line, next to ‘ss:’)
Write the name of the country where the embassy is located – the country you are in on the day of your appointment.
Example: Bulgaria
Name (Print Full Name)
Print your full legal name exactly as it appears on your U.S. passport or other citizenship document. Use your current legal name. Do not use nicknames or abbreviations.
Example: JENNIFER ANNE SMITH
City or Town (place of birth)
Write the city or town where you were born.
Example: Chicago
Province or County (place of birth)
Write the county, province, or region within the state or country where you were born. For U.S.-born citizens, this is typically the county.
Example: Cook County
State or Country (place of birth)
Write the state (if born in the U.S.) or country (if born abroad) where you were born.
Example: Illinois, or if born abroad: United Kingdom
Date of Birth (mm-dd-yyyy)
Write your date of birth in the exact format shown: month first, then day, then the 4-digit year. Use leading zeros for single-digit months and days.
Example: 03-15-1985 means March 15, 1985
Former U.S. Address (Street Address + City, State, ZIP)
Write the last address where you lived in the United States. Use two lines: first the street address, then the city, state, and ZIP code on the second line. If you have never lived in the U.S., write ‘Never resided in the United States.’
Example: Line 1: 456 Oak Avenue, Apt 2B | Line 2: New York, NY 10001
IMPORTANT: This is your last known U.S. address, not your current address abroad.
How you became a U.S. national. Tick one box
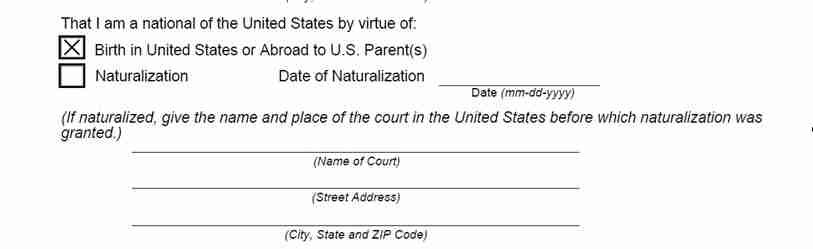
There are two checkboxes. Tick the one that applies to you:
Box 1 Birth in United States or Abroad to U.S. Parent(s)
Tick this if you were born a U.S. citizen — either because you were born on U.S. soil, or because one or both of your parents were U.S. citizens when you were born abroad.
Box 2 Naturalization
Tick this if you became a U.S. citizen through a naturalization ceremony after birth. You will also need to fill in the date of naturalization and the court details below.
Date of Naturalization (only if you ticked ‘Naturalization’)
Write the exact date you were naturalized as a U.S. citizen. Use mm-dd-yyyy format.
Example: 06-20-2001
Name of Court (only if you ticked ‘Naturalization’)
Write the official name of the U.S. court or USCIS field office where your naturalization was granted.
Example: U.S. District Court for the Southern District of Florida
Court Street Address (only if you ticked ‘Naturalization’)
Write the street address of that court or field office.
Example: 400 N. Miami Avenue
Court City, State and ZIP Code (only if you ticked ‘Naturalization’)
Write the city, state, and ZIP code of that court.
Example: Miami, FL 33128
The oath paragraph. Pre-written, nothing to fill in
The large italic paragraph in the middle of the form is the formal legal oath. You do not write anything here. The words are already printed. Read it carefully before your appointment so you understand what you are swearing to.
In plain language, it says:
• You want to formally give up your U.S. nationality.
• You are giving up all rights and privileges that come with it.
• You are also giving up all duties and allegiance to the United States.
• You are doing this freely, without any pressure or force.
Tip: Read this paragraph out loud a few times before your appointment. The officer may ask you to read it aloud or ask if you understand it. Knowing what it says will make the appointment less stressful.
IMPROTANT: Signing this form before your appointment, outside the presence of a consular officer, makes the form invalid. You would need to complete a new form at the embassy.
The bottom section. Filled in by the consular officer
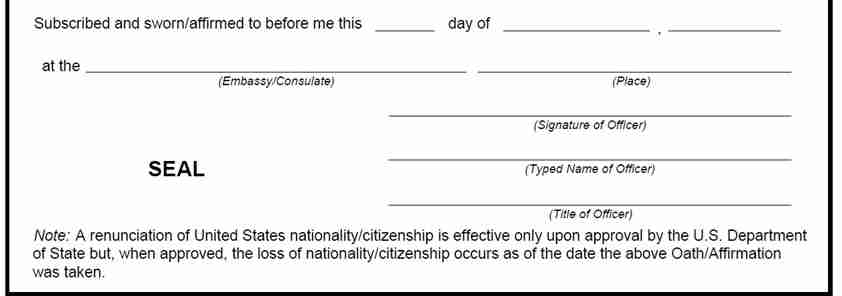
Everything below the signature line is completed by the U.S. consular officer, not by you. They will fill in:
• The date, month, and year the oath was sworn (the day of your appointment.)
• The embassy or consulate name and the place (city/country).
• Their own signature.
• Their typed name.
• Their official title.
• The official embassy seal.
IMPORTANT: Do not write anything in the officer’s section. Leave all of those lines blank when you arrive at the embassy.
The important note at the bottom of the form
The form includes this official note:
“A renunciation of United States nationality/citizenship is effective only upon approval by the U.S. Department of State but, when approved, the loss of nationality/citizenship occurs as of the date the above Oath/Affirmation was taken.”
In plain language, this means two things:
• You are not officially stateless the moment you sign. The U.S. Department of State in Washington D.C. still has to review and approve your application.
• But once they do approve it, your citizenship is considered to have ended on the date you took the oath at the embassy, not the later date when State approved it.
This means the process is not instant. After your embassy appointment, your application goes to Washington D.C. for final review. You will receive a Certificate of Loss of Nationality (CLN) once it is approved. Keep your U.S. passport until you receive the CLN. Do not destroy it.


